![Insights_horiz-1.png]](https://support.elumenconnect.com/hs-fs/hubfs/Insights_horiz-1.png?height=40&name=Insights_horiz-1.png)
Introduction
Power BI is a powerful business analytics tool that allows you to create interactive reports and dashboards from your data. By connecting Power BI to your Insights Data Lake, you can access and visualize all your assessment and outcome data directly in Power BI, enabling deeper analysis and custom reporting capabilities.
This guide walks you through the process of connecting Power BI Desktop to your Insights Data Lake hosted on Amazon Redshift.
Prerequisites
Before you begin, ensure you have the following:
✓ Power BI Desktop installed on your computer
✓ Administrator access to your Insights account
✓ Your outgoing IP address whitelisted by your system administrator
✓ Amazon Redshift connection credentials (username and password)
✓ Basic familiarity with Power BI and database connections
Important: Contact your system administrator to whitelist your outgoing IP address before proceeding with the connection steps below.
Step-by-step Connection Instructions
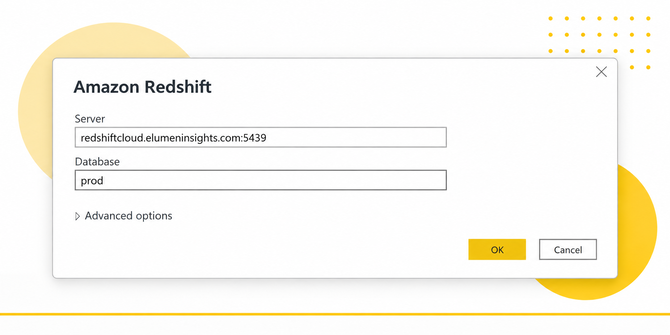
Step 1: Open Power Query Desktop and Select Amazon Redshift
- Open Power BI Desktop on your computer
- Click Get Data in the Home ribbon
- In the Get Data window, search for or select Amazon Redshift
- Click Connect
Step 2: Enter Server and Database Information
In the Amazon Redshift connection dialog, enter the following information exactly as specified:
| Field | Value |
|---|---|
| Server | redshiftcloud.elumeninsights.com:5439 |
| Database | prod |
Important Notes:
- The server field includes both the URL and port number (
:5439) - The port is required and must be included in the Server field
- Double-check for spelling and spacing; these are case-sensitive
After entering both values, click OK to proceed.
Step 3: Enter Your Credentials
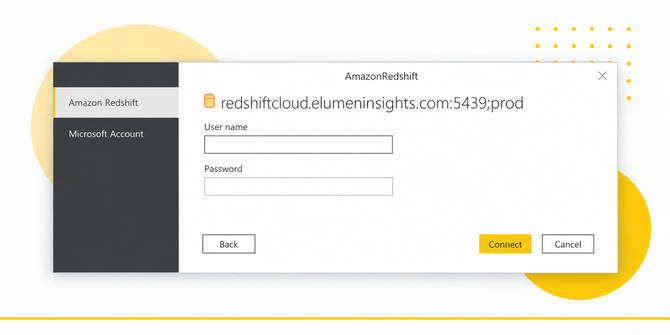
If this is your first time connecting to the Insights Data Lake:
- When prompted, select the Amazon Redshift authentication type
- Enter your username in the provided field
- Enter your Password in the provided field
- Click Connect
Tip: Save your credentials securely. You can optionally check "Remember my password" for future connections, but this is not recommended on shared computers.
Step 4: Select Data Elements to Import
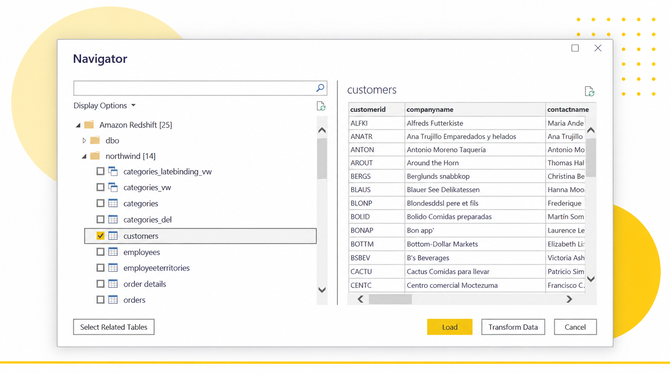
Once the connection is established, the Navigator window will appear displaying all available data on the server.
Available Object Types:
- Tables
- Views
- External Tables
- External Views
- System Tables
- System Views
How to Select Data:
- Browse the Navigator to find the tables or views you need
- Check the checkbox next to each element you want to import
- You can select multiple elements at once
- Use the search function to locate specific tables quickly
Note: Some object types, such as consumer-database objects, may not appear in Navigator but can be referenced by name in your query, depending on your permissions. Contact your administrator if you need access to specific data.
Step 5: Load or Transform Your Data
After selecting the data elements you need, you have two options:
Option A: Load Data Directly
- Click Load to import your selected data immediately into Power BI
Option B: Transform Data First
- Click Transform Data to open the Power Query editor for additional data cleaning and transformation before loading
Choose the option that best fits your workflow. You can always edit or refresh queries later.
Step 6: Choose Your Data Connectivity Mode
Before finalizing your connection, select one of two data connectivity modes: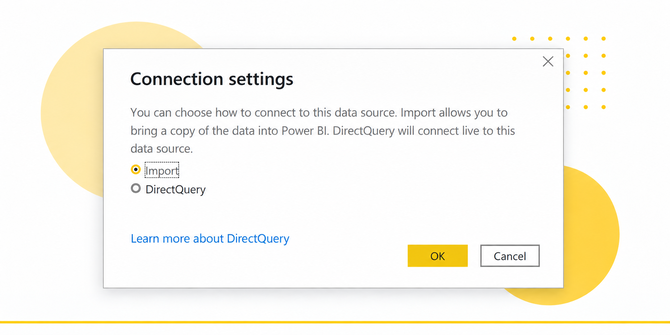
| Mode | Best For | Characteristics |
|---|---|---|
| Import | Smaller datasets; faster performance; offline analysis | Data is copied into Power BI; file size increases; data refreshes on schedule |
| DirectQuery | Large datasets; real-time data; reduce file size | Data queried directly from Redshift; slower performance; always up-to-date |
- Select your preferred connectivity mode
- Click OK to complete the connection
Your data is now ready to use in Power BI!
Related Settings & Features
See Also:
- How do I manage data refresh schedules in Power BI?
- How do I create a Power BI report from Insights data?
- Insights Data Dictionary and Field Reference
Tips & Best Practices
✅ Start with DirectQuery if you're unsure which mode to use. You can always switch to Import mode later if performance is acceptable.
✅ Use the Transform Data option to remove unnecessary columns and rows before importing, which will reduce file size and improve performance.
✅ Test your connection with a small dataset first before importing large tables, especially when using Import mode.
✅ Schedule regular data refreshes to keep your Power BI reports current with the latest Insights data.
✅ Maintain separate Power BI files for different purposes (reporting, exploration, testing) to avoid conflicts and keep file sizes manageable.
Troubleshooting
Problem: "Connection Failed" Error
Solution: Verify that:
- Your outgoing IP address has been whitelisted by your administrator
- Your username and password are correct
- You have proper permissions to access the Insights Data Lake
- Your firewall allows connections to port 5439
Problem: "Server Not Found" Error
Solution: Check that you've entered the server address exactly as specified:
redshiftcloud.elumeninsights.com:5439 Ensure you've included the port number (:5439) and there are no extra spaces.
Problem: Tables or Views Don't Appear in Navigator
Solution:
- Verify your user account has the correct database permissions
- Check that you've selected the correct database (
prod) - Contact your administrator if you believe you should have access to specific tables
Problem: Very Slow Data Import or Query Performance
Solution:
- Consider switching from Import to DirectQuery mode
- Reduce the number of columns being imported
- Use filters to import only necessary data
- Check your internet connection speed
Next Steps
✅ After connecting: Create your first Power BI report using the Insights data
✅ Set up auto-refresh: Configure a refresh schedule to keep data current
✅ Explore advanced features: Learn about parameters, measures, and DAX formulas
✅ Share your reports: Publish reports to Power BI Service for team collaboration