![Insights_horiz-1.png]](https://support.elumenconnect.com/hs-fs/hubfs/Insights_horiz-1.png?height=40&name=Insights_horiz-1.png)
Who Can Manage Terms and Academic Years?
This feature is available to users with an Assessment Coordinator role. If you do not see the options described below, contact your system administrator to review your permissions.
Getting Started
Navigating to Term Management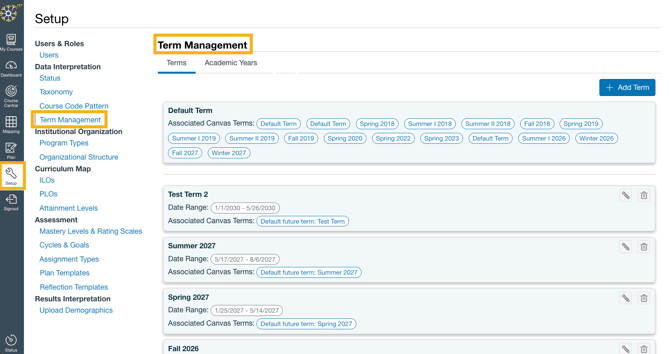
- Log in to Insights with your Assessment Coordinator credentials.
- Click the Setup icon in the left-hand navigation panel.
- Under the Data Interpretation section, select Terms Management.
Managing Terms
Adding a Term to an Academic Year
-
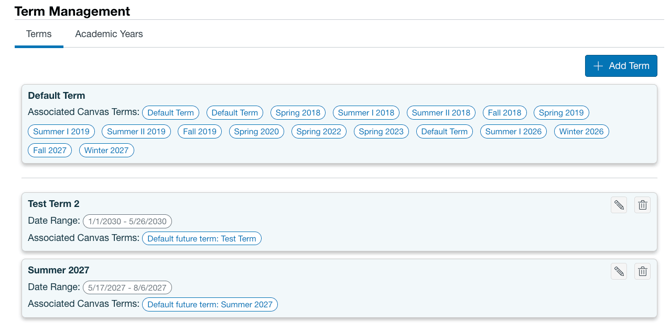
From the Term Mangement page, select Terms
-
Click + Add Term.
-
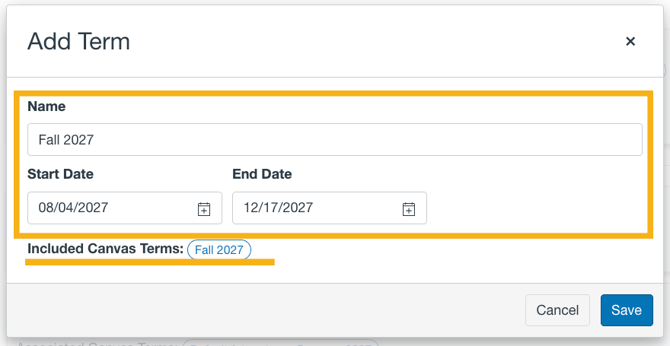
Complete the following fields:
-
Term Name – A clear label (e.g., Fall 2024, Spring 2025, Summer Session I).
-
Start Date – The first day of the term.
-
End Date – The last day of the term.
- Included Canvas Terms – Indicates what Terms from Canvas are included in the Insights Term.
-
-
Click Save.
⚠️ Warning: Terms start and end dates should not overlap, as this may cause inconsistencies in reporting.
Editing a Term

-
Expand the relevant academic year.
-
Click the Edit (pencil) icon next to the term you want to modify.
-
Make your changes and click Save Changes.
Deleting a Term

-
Click the More Options (⋮) menu next to the term.
-
Select Delete.
-
Confirm the deletion.
Managing Academic Years
Creating a New Academic Year
-
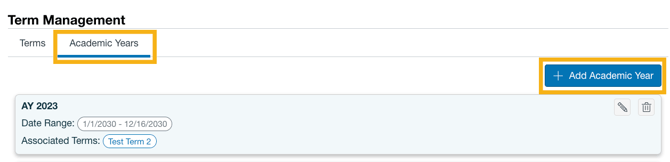
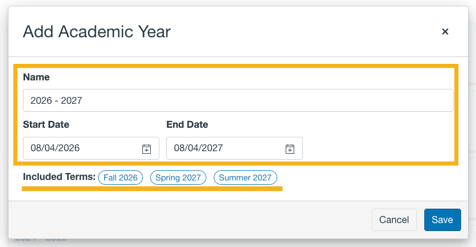
On the Terms Management page, click Academic Years. Then select + Add Academic Year
-
Enter the following details:
-
Name – A descriptive label (e.g., 2024–2025 Academic Year).
-
Start Date – The first day of the academic year.
-
End Date – The last day of the academic year.
- Included Terms – This is not editable; it will show the terms included in this Academic Year.
-
-
Click Save.
⚠️ Warning: Academic year date ranges should not overlap with other existing academic years, as this may cause inconsistencies in reporting.
Editing an Academic Year

-
Locate the academic year you wish to update from the list.
-
Click the Edit (pencil) icon to the right of the academic year name.
-
Update the relevant fields.
-
Click Save Changes.
⚠️ Note: Changing the dates of an academic year that already has associated terms or data may affect historical reports. Review any impact before saving.
Deleting an Academic Year

-
Locate the academic year you wish to remove.
-
Click the More Options (⋮) menu and select Delete.
-
Confirm the deletion in the dialog box.
⚠️ Warning: Deleting an academic year will also remove all associated terms and their linked data from Insights. This action cannot be undone.
Best Practices
- ✅ Set up academic years and terms before importing data to ensure records are correctly attributed to the right time period.
- ✅ Use consistent naming conventions (e.g., Fall 2024, Spring 2025) to make filtering and reporting intuitive for all users.
- ✅ Review term date ranges to ensure they are accurate and do not overlap within the same academic year.